
MIDI & piano roll
MIDI devices, recording, step input, the piano roll, quantize, and transforms.
November 4 development behavior: Ctrl+click (Cmd+click on macOS) separate MIDI clips, then right-click a selected clip. Join Selected MIDI Clips (N) shows its effective shortcut (Ctrl+J in the OpenStudio Windows timeline profile) or why the selection cannot be joined. Clips must share an unlocked, unfrozen track. Joined overlapping same-key notes retain their pair, mute and release identities with one Undo. Export Selected MIDI Clips (N)... writes one .mid file without joining: one MIDI track per source track, earliest selected start at zero, relative gaps and visible trims/loops retained. Muted clips/notes are excluded. Export This MIDI Clip... exports only the clicked clip. The blue time selection does not crop selected-clip export. Export Selected MIDI Clips... is also in the Command Palette and can receive a custom shortcut; it has no new default binding.
Unreleased October 31 changes use 9,600 ticks per quarter note for project and clip-context exports, preserving closely spaced controller changes with standard quarter-note and notation metadata. A receiving DAW can still quantize or combine controller events when it exports again.
Detect Tempo compares repeated note grids across a chosen retained range, or uses source tempo metadata when present. Review pulse-family candidates and section spread; evidence is not a calibrated probability or a detected downbeat. Tap pulse and manual beat-interval counting remain available for sparse or changing performances. Audition note guide + click uses bounded simple tones with adjustable click phase/grouping, not the track instrument or FX. Preview never starts project transport; Stop, Close, blur and changed clips cancel it. Apply Project Tempo changes only base BPM with one Undo.
Development features included in the referenced app commit: Join Selected MIDI Clips combines selected clips on one track with Ctrl/Cmd+J in the OpenStudio timeline keyboard profile. It preserves their visible trim/loop content, gaps, note channels and controllers, with one Undo; Piano Roll Glue Notes remains a separate command. MIDI drag previews now follow compatible destination tracks. Recording thumbnails use a fixed pitch range and viewport-bounded note drawing. Hover a Piano Roll note to see its name, velocity and duration. MIDI export preserves project tempo changes and meter rather than forcing 120 BPM. Clip exports rebase the tempo map to the clip start. Detect Tempo prefers retained imported MIDI tempo metadata; note-onset estimates can be ambiguous. These are unshipped source-checkout behaviors; other shortcut profiles and custom bindings can differ.
Unreleased development changes reviewed October 24, 2026 at app commit 1b5ba4b7: Ctrl/Cmd-dragging selected note bodies keeps their exact pitches and changes only time; it still bypasses grid snapping. Shift-dragging keeps exact original start times and changes only pitch. Both preserve durations, velocities and group spacing, with one Undo step. Shift-click still toggles a note in the selection; the body gesture distinguishes clicks from drags after five screen pixels. Edge resizing retains its behavior. Alt/Option copy plus movement commits as one undoable operation. Record now uses R, Ctrl/Cmd+R or numpad * in the OpenStudio keyboard profile; Ctrl/Cmd+Shift+R selects the Piano Roll Range tool when step input is disabled. These are unshipped development changes; other profiles/custom bindings can differ.
Unreleased September 29 working-tree additions after app commit 52cbd7c: File > Import > MIDI... opens a native .mid/.midi chooser with multi-selection. The OpenStudio-profile default is Ctrl+Alt+I (Cmd+Ctrl+I on macOS); other profiles/custom bindings differ. A single file uses a compatible selected MIDI/instrument track or creates a track. Multiple files create separate tracks at the cursor position captured when the chooser opened. Source MIDI tracks currently combine into one clip per file; project tempo is not replaced.
MIDI and Instrument tracks share the timeline with audio tracks, MIDI clips move and split like audio clips, and the piano roll opens from any MIDI clip. This page covers getting a controller in, recording, and the piano roll. Shortcuts are from the default OpenStudio keyboard profile; Ctrl is Cmd on macOS.
MIDI devices and track types
OpenStudio detects connected MIDI devices and lists them in the MIDI input selector on each MIDI or Instrument track header. If a controller is missing, connect and power it before launching OpenStudio, check that any vendor driver is installed, and restart the app.
Development features included in the referenced app commit: saved MIDI input and output names stay selected. A name marked (checking) is awaiting discovery, (unavailable) was absent from a successful device-list check, and (unverified) means the list could not be read. The saved route is retained; it does not automatically become All Inputs or No Out. Reconnect the saved device and restart OpenStudio to refresh the list if needed, or explicitly choose another listed device.
A MIDI track (Ctrl+Shift+T, or Insert → New MIDI Track) records and plays MIDI data. An Instrument track (Ctrl+Shift+I, or Insert → Virtual Instrument on New Track…) is a MIDI track with a virtual instrument (VST3) loaded; the Plugin Browser opens automatically when you create one.
Recording MIDI
- Create a MIDI track (
Ctrl+Shift+T) or an Instrument track (Ctrl+Shift+I). - On an Instrument track, select a virtual instrument in the Plugin Browser.
- Select your MIDI input device on the track header.
- Arm the track for recording.
- Enable monitoring so you hear the instrument while you play.
- Press
Rand play;Ctrl+Rand numpad*also record. Press Record again orSpaceto finish. - A MIDI clip with the recorded notes and CC data appears on the timeline.
Notes are previewed on the timeline while recording. Arming and monitoring are covered in Recording & editing.
Step input and the virtual keyboard
Step input enters notes one at a time from the computer keyboard.
- Open the piano roll and enable Step Input in its toolbar.
- Choose the step size: 1/4, 1/8, 1/16, or 1/32 note.
- Set the octave for keyboard input.
- Press
C,D,E,F,G,A, orBto insert a note. The cursor advances by one step after each note.
The 88-key on-screen keyboard toggles with Alt+B (macOS: Ctrl+B) or View → Show Virtual MIDI Keyboard. Clicking its keys sends notes to the selected MIDI or Instrument track, so you can sketch a part without a controller.
Step-sequencer state exists in the app, but no step-sequencer panel is mounted in the current build. Piano-roll step input is the supported workflow.
MIDI learn
MIDI Learn maps a controller CC to an exposed plugin parameter in a track or input FX chain.
- Open the track or input FX chain and expand the plugin parameter list.
- Click the MIDI Learn button beside the parameter.
- Move a CC control on your controller within ten seconds. Save the project to retain the mapping.
The piano roll
Double-click a MIDI clip to open the piano roll, docked below the arrangement or detached into its own window. It has a toolbar (Draw, Select, and Erase tools, step input, quantize, scale highlighting), a 128-note keyboard on the left that previews a pitch when clicked, the note grid, a velocity lane, and a CC lane.
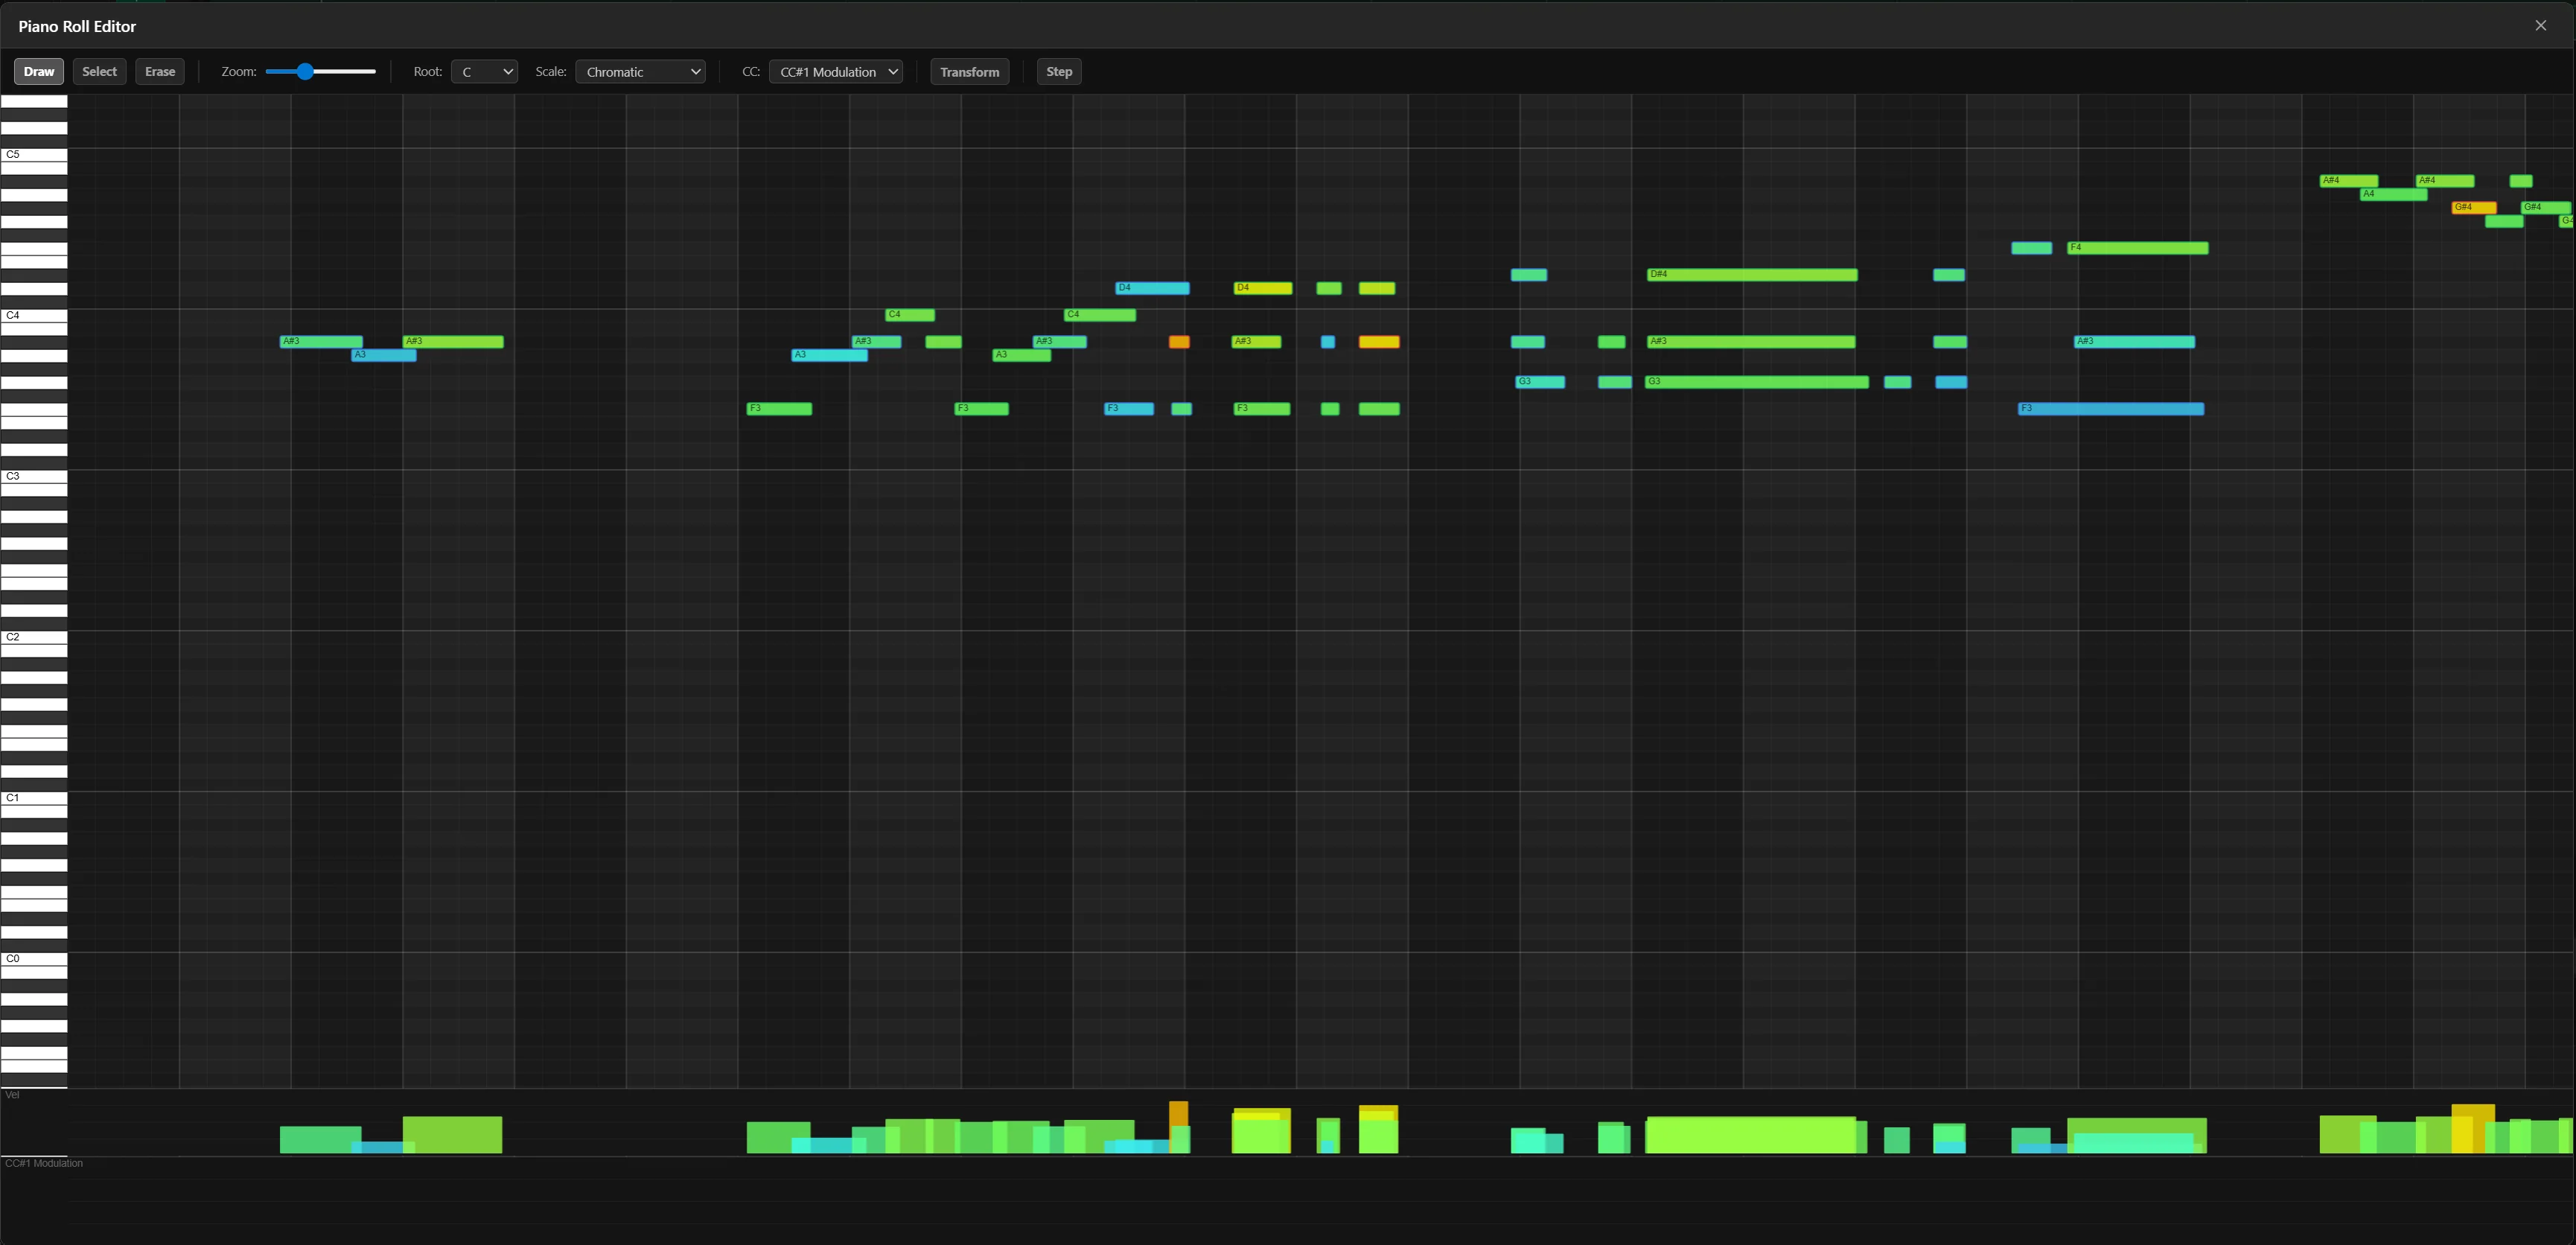
Snap, grid type, and the active quantize preset are shared with the arrangement view and saved with the project. When snap is on, drawing, moving, resizing, and splitting use the selected grid; hold Ctrl while dragging to place off-grid. Grid choices include bar, beat, straight, triplet, dotted, and time values; Adapt to Zoom picks a readable subdivision.
Drawing, selecting, and editing notes
- Draw: click in the grid to place a note at that row and column; drag while placing to set its length.
- Select: click a note,
Shift+Clickto add or remove from the selection, or drag on empty space to rubber-band.Ctrl+A(MIDI → Select All Notes) selects everything. - Move by dragging selected note bodies to a new pitch or time. Hold
Ctrlfor time-only movement with exact pitches held and snap bypassed; holdShiftfor pitch-only movement with exact start times held. Pitch locking does not re-snap notes into the displayed scale. Resize by dragging a note edge. - Delete with
Delete, or click notes with the Erase tool. - Split, glue, mute, audition, range selection, and a note inspector are also available.
Velocity
Velocity (0–127) is shown as a bar per note in the velocity lane; drag bars up or down to change it. MIDI → Velocity +10% and Velocity -10% scale the selected notes.
CC lanes
Pick a controller from the CC lane dropdown, then click and drag to draw values from 0 to 127. Presets cover CC#1 Modulation, CC#7 Volume, CC#10 Pan, CC#11 Expression, and CC#64 Sustain. Pitch bend, 14-bit CC, program and bank select, pressure, note-off velocity, and probability lanes exist where exposed.
Quantize, transforms, and scale highlighting
- Select the notes, or press
Ctrl+Afor all. - Open MIDI → Quantize Notes… and choose the grid, strength, and whether note ends are quantized too.
- Press
Qlater to reapply the last-used settings without opening the panel.
Quantize applies the active preset to starts, ends, both, or note length, with strength, swing, tuplets, and catch ranges. Factory and custom presets are saved with the project. Reset quantize and freeze quantize actions also exist.
| Operation | Effect on selected notes |
|---|---|
| Transpose +1 / -1 Semitone | Moves notes up or down one semitone |
| Transpose Octave Up / Down | Moves notes by 12 semitones |
| Velocity +10% / -10% | Scales velocity by 10 percent |
| Reverse MIDI Notes | Reverses the order of the notes in time |
| Invert MIDI Pitches | Mirrors pitches around a centre point |
Transforms sit in the Edit and MIDI menus with no default key binding; use the menu, the Command Palette (Ctrl+Shift+P), or bind your own (Keyboard shortcuts).
To stay in key, pick a Scale Root and a Scale Type in the toolbar: Chromatic, Major, Minor, Dorian, Mixolydian, Pentatonic Major, Pentatonic Minor, or Blues. Notes outside the scale get a dimmed background.
Multiple clips, drums, and audio to MIDI
The piano roll can show several MIDI clips at once. The primary clip keeps the velocity colouring; the others are tinted (pink, green, yellow, indigo) so you can edit a part in context.
A Drum Editor action and state exist, but no drum-grid editor is mounted in the current workspace. Edit MIDI drum parts in the piano roll.
Audio to MIDI extracts note data from an audio clip using the bundled Basic Pitch model and creates an adjacent MIDI track, with undo, for editing, layering, or replacement.
Audio-to-MIDI inference is enabled in the ONNX-enabled Windows and Linux releases only. The small Basic Pitch model ships with the app; the generation and stem runtimes are a separate install, see AI Tools setup.